Development and Deployment process
Olympe, is a development platform with Saas and On-premise offers. It provides specific steps to operate the development process in order to save, build and deploy what is developed by your team.
Here is a schema that summarizes the process of deploying work (from CODE and DRAW) done in one environment to another environment:
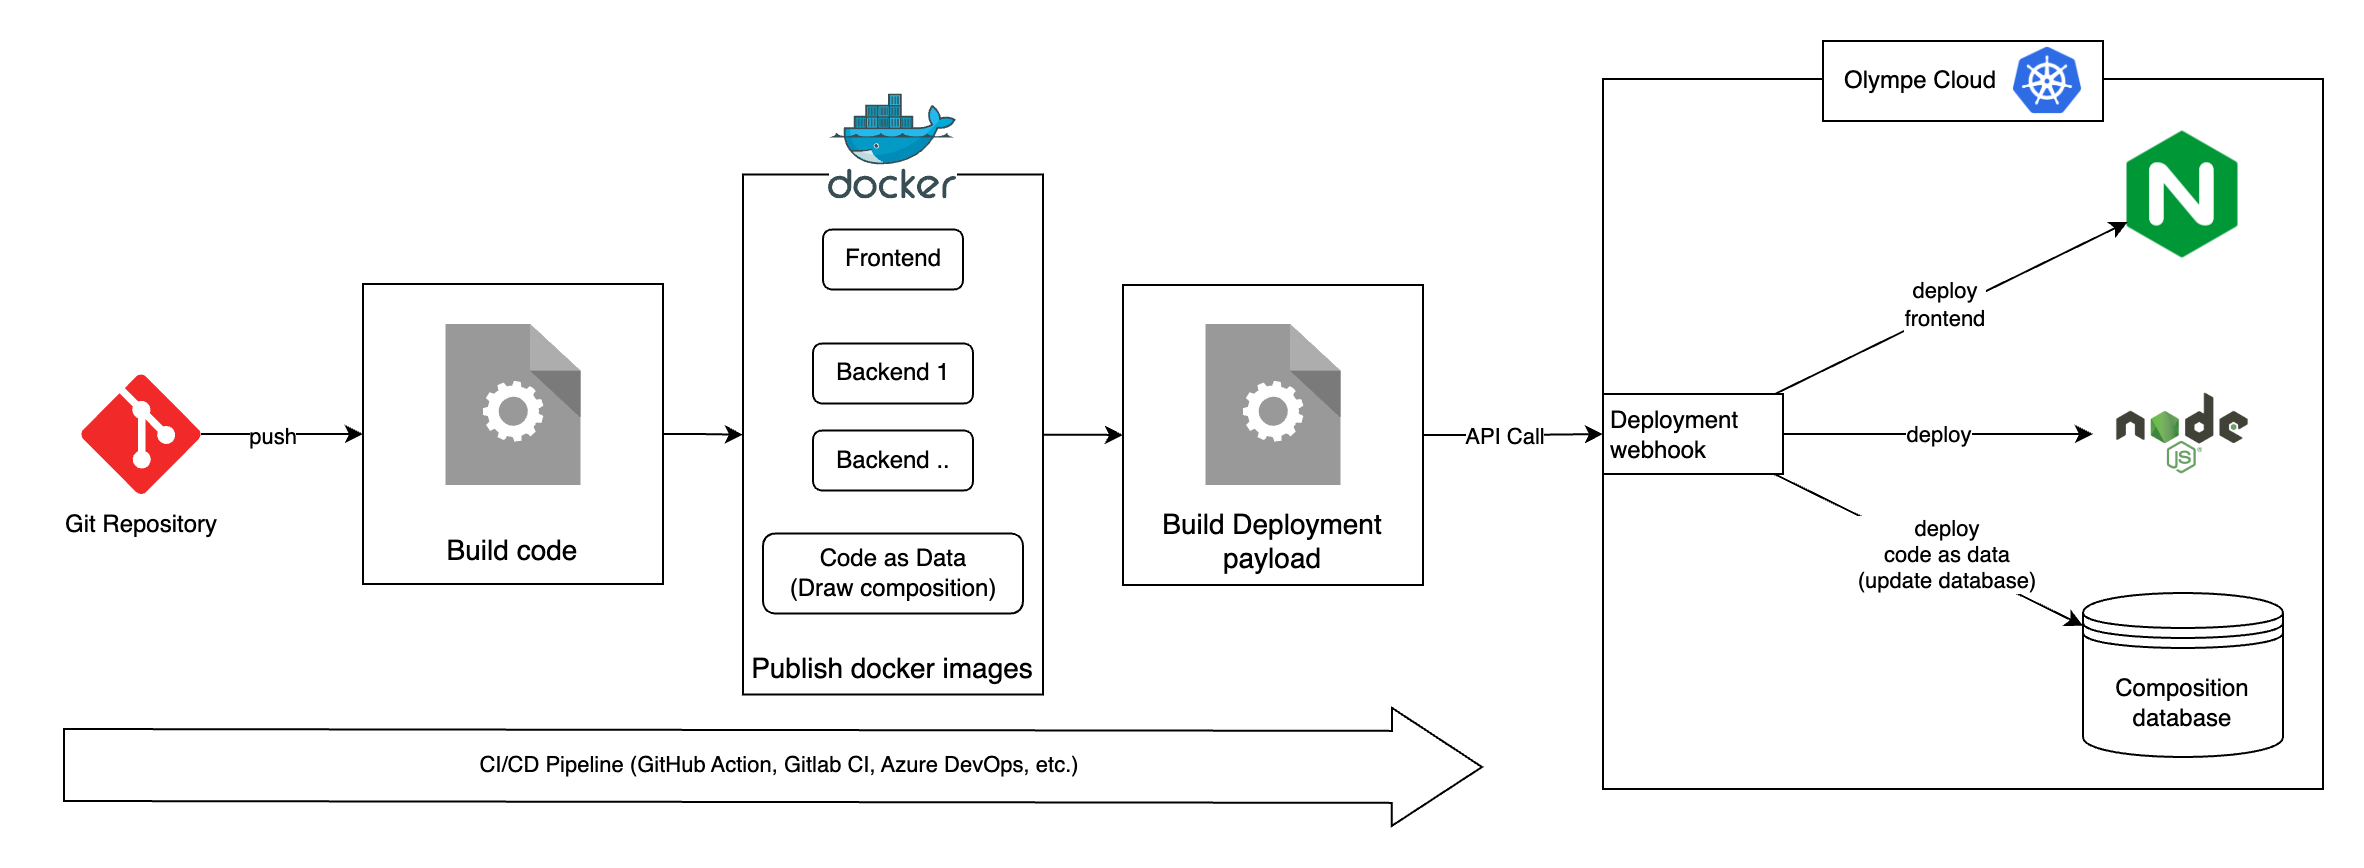
It is all based on docker images that can be built on 3 different basis:
- Nginx to deploy new code for the frontend applications
- NodeJS for backends (Service application)
- CodeAsData to deploy the compositions and development done in Draw.
The deployment steps are the following
All the steps described below can be automated in a CI/CD process like Jenkins, Gitlab CI, Azure or Github Actions. Please refer to the official documentation of these tools.
Saving Code as Data in git
After developing libraries or projects in Draw, developers need to package that work to be able to:
- Deploy the project and changes to another environment (e.g.: from development to production environments)
- Package the project with its JavaScript code into an NPM artifact to be pushed to a registry
To achieve that, it is convenient to create a snapshot of the code as data of your project and generate the patches files to be added into your git repository.
To save the code as data from Draw to patches files, use the toolkit snapshot command. That command requires a configuration file you could store in your git repository. It must contain a list of projects/folders to save, a destination directory.
[
  {
    "snapshooter": {
      "name": "My Projects",
      "rootTags": ["10000000000000000000"],
      "exclude": ["10000000000000000001"],
      "outputDir": "snapshot"
    }
  }
]
This is a typical example of a snapshooter configuration file: it tells the toolkit to snapshot all the projects from Home (10000000000000000000) except what is inside the Olympe folder (10000000000000000001), and to store the patches in the snasphot folder of your project.
Once the code as data files are generated, they can be commit to the git repository like standard code source files.
Automatically commit and push snapshot to git
The snapshooter is designed to be used in jobs or cron jobs in your infrastructure to automatically save and commit the patches to the git repository. In order to tell the snapshooter to commit and push the changes to you repository, you need to complete the documentation like this:
[
  {
    "snapshooter": { ... },
    "git": {
      "repo": "https://<token>@<repository_url>.git",
      "branch": "master",
      "commitMessage": "Snapshot at {date} in {folder}"
    }
  }
]
This will tell the snapshooter to clone the specified repository on the given branch. Do the snapshot in the specified outputDir based on the repository folder, and finishes the process by committing and pushing in case of changes, with the specified commit message.
The commit message can be formatted:
{date}: write the date with the specified format: yyyy.MM.dd hh:mm:ss.{folder}: theoutputDirvalue from the configuration.
Build your project
Olympe requires NodeJS version 20 or above (download)
Like any modern Javascript project, you can use the javascript code bundler/builder of your choice (eg: webpack, esbuild, vite, etc.) to build your source code file.
In the example below, the code as data will be built as a final project, but you can also build it as a library of bricks, serving as an Olympe component to be used in multiple place.
Run the following commands to build your code:
npm install
#build:draw to build your frontend
npm run build:draw
# build:node to build your backend
npm run build:node
#buildCodeAsData to build code as data
npx olympe buildCodeAsData
This will generate all the necessary files and patches with the appropriate configuration files for the project to be deployed on an environment in the following directories:
dist/webfor the frontend.dist/nodefor the backend.dist/codeAsDatafor the codeAsData.
These folder will be used as base directory to build the docker images.
Build docker images
Olympe requires Docker version 24 or above: Download
As described in the introduction, an Olympe environment deployed on the Olympe cloud relies on 3 types of docker images: Frontend, Backend and CodeAsData. All of them should already be present in the docker directory of your project.
the $SOURCES_PATH variable should match the correct build directory for each image as explained in the previous step.
- Frontend
- Backend
- Code as Data
It will contain the files built and required by the UI Applications and delivered by the web server. The olympeio/frontend-base image is based on Nginx:
FROM olympeio/frontend-base:stable
COPY --chown=nginx:root $SOURCES_PATH /usr/share/nginx/html
That image should contain the javascript files to be executed by NodeJS to run backend applications. The olympeio/backend-base image is based on NodeJS:
FROM olympeio/backend-base:18-stable
COPY $SOURCES_PATH /home/node/app
The code as data image must contain the patches generated by the toolkit when using the buildCodeAsData command:
FROM olympeio/codeasdata-base:stable
COPY --chown=1000:1000 $SOURCES_PATH /root/patches
RUN chmod 775 ~/patches
RUN chown -R 1000:1000 ~/patches
Deploy docker images
In order to deploy the newly built docker images to the Olympe Cloud, you will have to do a call to the API with the correct payload.
First, contact your Olympe referent and ask for the webhook URL and authorization token. Once you have this information, you can then send a request (using curl or tools like Postman or Insomnia) with the following information:
- URL: URL provided by Olympe
- Method:
POST - Auth:
Bearer <token provided by Olympe> - Headers:
Content-Type: application/json
- Body: the JSON formatted payload. Example:
{
	"backends": {
		"images": [
			"my-registry/image-for-backend-1:tag",
			"my-registry/image-for-other-backends:tag"
		],
		"deployRules": [
			{
				"source": "^my-registry\/image-for-other-backends:tag.*$",
				"target":"^(?!backend-1).*$"
			},
			{
				"source": "^my-registry\/image-for-backend-1:tag.*$",
				"target": "^backend-1.*$"
			}
		]
	},
	"codeAsData": {
		"image": "my-registry/image-for-codeasdata:tag",
	},
	"frontend": {
		"image":"my-registry/image-for-frontend:tag"
	}
}
Here is the detail of the available keys and values:
| Key | Required | Default value | Description |
|---|---|---|---|
backends.images | if backends is present | N/A | Array of backend images to deploy (if applicable), following the deploy rules |
backends.deployRules | if backends.images is present | N/A | Deploy rules for the backend deployment |
backends.deployRules[].source | yes | N/A | Deploy rules for the backend deployment |
backends.deployRules[].target | yes | N/A | Deploy rules for the backend deployment |
codeAsData.image | no | N/A | Code As Data image to deploy (if applicable) |
codeAsData.updateMode | no | auto | Whether to deploy code as data manually (via an approval step) or automatically. can be auto or manual |
frontend.image | if frontend is present | N/A | Code As Data image to deploy (if applicable) |
noDowntime.promotionMode | if noDowntime is present | auto | Whether to promote deployments manually (via an approval step) or automatically. Only applicable if no downtime mode is enabled on the instance. can be auto or manual |
skipUpdateVersions | no | false | Wheter to skip automatic update of Orchestrator and Toolkit based on stable-versions. Should not be used, only when working with dedicated snapshot versions of the orchestrator or toolkit. Can be true or false |
extraArgs | no | [] | Array of additional arguments to be added to the deploy process. Currently only --force-sync can be provided, which will force the codeasdata to be synced to the orchestrator |
Deploy Rules
As you might require to build and deploy multiple backends with different code base within a single deployment, you will have to set deploy rules to define which image will be deployed to which backend. For each deploy rule you will have to set a source and target as shown in the example above.
sourceis a regular expression that must match the source image (example formy-registry/image-for-other-backends:tag)targetis a regular expression must match the target backend(s) name (example forbackend-2orbackend-3)
You can define as many deploy rules as you want. To help you out, you can use tools like regex101.
If you provided the correct information, you should receive a success message:
{
	"message": "success"
}
You can then monitor your CI/CD.
Integrate with your CI
There are many different ways to integrate this with your CI, as long as you call the right API with the correct payload as shown above. Below are some examples you can use for inspiration:
- Gitlab CI
- Azure Devops
For this example to work, you will have to define a WEBHOOK_TOKEN variable as a secret variable in Gitlab CI/CD
variables:
  REGISTRY: <docker registry>
  IMAGE_NAME: <image-name>-$DOCKERFILE
  DOCKER_DIRECTORY: docker
  BUILT_BRANCHES_REGEX: master
  TAG_SUFFIX: $CI_COMMIT_SHORT_SHA
  DEPLOY_CODE_AS_DATA:
    value: "false"
    description: "If set to 'true', build and deploy a code as data image"

stages:
  - build-src
  - build-docker
  - deploy

.build-docker-image:
  stage: build-docker
  extends:
   - .rules
  image:
    name: gcr.io/kaniko-project/executor:v1.20.1-debug
    entrypoint: [""]
  dependencies:
    - build
    - init-requirements
  variables:
    AWS_DEFAULT_REGION: "eu-central-1"
  script:
    - echo "{\"auths\":{\"https://index.docker.io/v1/\":{\"username\":\"$DOCKER_REGISTRY_USER\",\"password\":\"$DOCKER_REGISTRY_PASSWORD\"}}}" > /kaniko/.docker/config.json
    - IMAGE_NAME=$(echo $IMAGE_NAME | sed 's/professional-services-//g')
    - destination="$REGISTRY/$IMAGE_NAME:latest $REGISTRY/$IMAGE_NAME:$CI_COMMIT_REF_SLUG-$TAG_SUFFIX $REGISTRY/$IMAGE_NAME:$CI_COMMIT_REF_SLUG"
    - |
      for tag in $ADDITIONAL_TAGS; do
        destination="${destination} $REGISTRY/$IMAGE_NAME:${tag}"
      done
    - |
      if [ ! -z "$CI_COMMIT_TAG" ]; then
        destination="${destination} $REGISTRY/$IMAGE_NAME:$(echo "$CI_COMMIT_TAG" | tr _/:\  ----)"
      fi
    - kaniko_destination=$(echo $destination | sed 's/ / --destination /g')
    - echo "[INFO] building image..."
    - /kaniko/executor --context . --dockerfile $DOCKER_DIRECTORY/$DOCKERFILE.Dockerfile  --build-arg="SOURCES_PATH=$SOURCES_PATH" $ADDITIONAL_ARGS --label draw_version=$DRAW_VERSION --destination $kaniko_destination
  artifacts:
    reports:
      dotenv: build.env

.rules:
  rules:
    - if: $CI_PIPELINE_SOURCE == 'merge_request_event'
      when: never
    - if: $CI_COMMIT_BRANCH =~ $BUILT_BRANCHES_REGEX
      when: on_success
    - when: never

.codeAsData-rules:
  rules:
    - if: $CI_PIPELINE_SOURCE == 'merge_request_event'
      when: never
    - if: $DEPLOY_CODE_AS_DATA == 'true'
      when: on_success
    - if: $CI_COMMIT_BRANCH =~ $BUILT_BRANCHES_REGEX
      when: manual
      allow_failure: true # Avoid this manual job to block the rest of the pipeline
    - when: never

build:
  stage: build-src
  script:
    - apt-get install -y jq
    - npm update --cache .npm
    - sh ./bumpVersion.sh
    - npm run build:node
    - npm run build:draw
    - npx olympe buildCodeAsData
    - echo "DRAW_VERSION=$(jq -r '.version' $VERSION_FILE_PATH)" >> build.env
  variables:
    VERSION_FILE_PATH: node_modules/@olympeio/draw/package.json
  artifacts:
    expire_in: 1 day
    paths:
      - dist
    reports:
      dotenv: build.env

build-frontend-image:
  extends:
    - .build-docker-image
  after_script:
    - echo "FRONTEND_IMAGE=$REGISTRY/$IMAGE_NAME:$CI_COMMIT_REF_SLUG-$TAG_SUFFIX" >> build.env
  variables:
    DOCKERFILE: frontend
    SOURCES_PATH: dist/web

build-backend-image:
  extends:
    - .build-docker-image
  after_script:
    - echo "BACKEND_IMAGE=$REGISTRY/$IMAGE_NAME:$CI_COMMIT_REF_SLUG-$TAG_SUFFIX" >> build.env
  variables:
    DOCKERFILE: backend
    SOURCES_PATH: dist/node

build-codeAsData-image:
  extends:
    - .build-docker-image
    - .codeAsData-rules
  after_script:
    - echo "CODEASDATA_IMAGE=$REGISTRY/$IMAGE_NAME:$CI_COMMIT_REF_SLUG-$TAG_SUFFIX" >> build.env
  variables:
    DOCKERFILE: codeasdata
    SOURCES_PATH: dist/codeAsData

deploy:
  stage: deploy
  environment:
    name: $INSTANCE
  extends:
   - .rules
  image: argoproj/argocli:latest
  variables:
    URL:
    PAYLOAD: |
      # Here put your json payload without the images reference
  before_script: |
  - json_data=$(echo $PAYLOAD)
    - |
      # If CODEASDATA_IMAGE variable exists, then it will add it to the payload
      if [ ! -z "$CODEASDATA_IMAGE" ] ; then
        json_data=$(echo $json_data | jq ".codeAsData.image = \"$CODEASDATA_IMAGE\"")
      fi
    - |
      # For any variable that contains BACKEND_IMAGE, it will add it to the payload
      for var_name in $(compgen -v | grep 'BACKEND_IMAGE'); do
        json_data=$(echo $json_data | jq ".backends.images += [\"${!var_name}\"]")
      done
    - |
      # If FRONTEND_IMAGE variable exists, then it will add it to the payload
      if [ ! -z "FRONTEND_IMAGE" ] ; then
        json_data=$(echo $json_data | jq ".frontend.image = \"$FRONTEND_IMAGE\"")
      fi
    - status_code=$(curl -s -w "%{http_code}" -o response.json -X POST -H "Content-Type: application/json" -H "Authorization: Bearer $WEBHOOK_TOKEN" -d "$json_data" $URL)
    - |
      if [ "$status_code" -ne 200 ]; then
        echo "Error: API returned status code $status_code";
        cat response.json;
        exit 1;
      fi
For this example to work, you will have to define corresponding tokens as secret variables in Azure Devops
trigger:
    - develop
    - stable
    - master

resources:
    - repo: self

variables:
    service_connection: <spn reference>
    login_server: <docker registry>
    tag_version: '$(Build.SourceBranchName)-$(Build.BuildNumber)-$(Build.SourceVersion)'
    version_file_path: node_modules/@olympeio/draw/package.json
    url: <url>
    project_name: <project>

    # Agent VM image name
    vmImageName: 'ubuntu-latest'

stages:
    - stage: Build
      displayName: Build and push stage
      jobs:
          - job: Build
            displayName: Build
            pool:
                vmImage: 'ubuntu-latest'
            steps:
                - task: NodeTool@0
                  inputs:
                      versionSpec: '20.x'
                  displayName: 'Install Node.js'
                - task: npmAuthenticate@0
                  inputs:
                      workingFile: .npmrc
                      customEndpoint: sheetjs
                - script: |
                      sudo apt-get install -qq -y jq
                      set -e
                      sh ./bumpVersion.sh
                      npm i --cache .npm
                      npm run build:node
                      npm run build:draw
                      if [ "$(DEPLOY_CODE_AS_DATA)" = "true" ]
                      then
                        npm run codeAsData
                      fi
                      DRAW_VERSION=$(jq -r '.version' ${{ variables.version_file_path }})
                      echo "##vso[task.setvariable variable=DRAW_VERSION]$DRAW_VERSION"
                  displayName: 'Building sources'
                - task: AzureCLI@2
                  displayName: Build and push images
                  inputs:
                      azureSubscription: $(service_connection)
                      scriptType: bash
                      scriptLocation: inlineScript
                      inlineScript: |
                          az --version
                          az account show
                          az acr login --name "$(login_server)"
                          cd "$(Build.SourcesDirectory)"
                          docker build . --tag "$(login_server)/$(project_name)-backend:$(tag_version)" -f res/docker/backend.Dockerfile
                          docker build . --label draw_version=$(DRAW_VERSION) --tag "$(login_server)/$(project_name)-frontend:$(tag_version)" -f res/docker/frontend.Dockerfile
                          if [ "$(DEPLOY_CODE_AS_DATA)" = "true" ]
                          then
                            docker build . --tag "$(login_server)/$(project_name)-codeasdata:$(tag_version)" -f res/docker/codeasdata.Dockerfile
                          fi
                          docker push "$(login_server)/$(project_name)-backend:$(tag_version)"
                          docker push "$(login_server)/$(project_name)-frontend:$(tag_version)"
                          if [ "$(DEPLOY_CODE_AS_DATA)" = "true" ]
                          then
                            docker push "$(login_server)/$(project_name)-codeasdata:$(tag_version)"
                          fi
                - script: |
                    if [[ "$(Build.SourceBranchName)" == "develop" ]]; then
                      token="$(INSTANCE_CODEV_TOKEN)"
                      instance="<instance-codev>"
                    elif [[ "$(Build.SourceBranchName)" == "stable" ]]; then
                      token="$(INSTANCE_CODEV_TOKEN)"
                      instance="<instance-preprod>"
                    elif [[ "$(Build.SourceBranchName)" == "master" ]]; then
                      token="$(INSTANCE_CODEV_TOKEN)"
                      instance="<instance>"
                    fi
                    url=$(url)/$(project_name)/$instance
                    payload='{
                      "backends": {
                        "images": [
                          "$(login_server)/$(project_name)-backend:$(tag_version)"
                        ],
                        "deployRules": [
                          {
                            "source": "^$(login_server)\/$(project_name)-backend:develop-.*$",
                            "target":".*"
                          }
                        ]
                      },
                      "codeAsData": {
                        "updateMode": "auto"
                      },
                      "frontend": {
                        "image": "$(login_server)/$(project_name)-frontend:$(tag_version)"
                      },
                      "noDowntime": {
                        "promotionMode": "auto"
                      },
                      "skipUpdateVersions": false
                    }'

                    json_data=$(echo $payload)
                    if [ "$(DEPLOY_CODE_AS_DATA)" = "true" ]; then
                      json_data=$(echo $json_data | jq ".codeAsData.image = \"$(login_server)/$(project_name)-codeasdata:$(tag_version)\"")
                    fi

                    http_code=$(curl -s -o /dev/null -w "%{http_code}" -X POST $url \
                      -H "Content-Type: application/json" \
                      -H "Authorization: Bearer $token" \
                      -d "$json_data")

                    if [[ "$http_code" =~ ^(4|5) ]]; then
                      echo "Request failed with HTTP status code $http_code"
                      exit 1
                    fi
                  displayName: 'Deploy'