Install CODE & DRAW locally
The local installation is only required if you want to run back-ends, or if you want to use coded bricks.
The steps in this tutorial will allow you to:
- code and run your own bricks locally
- run Service Apps as back-ends
Prerequisites for installing Olympe
You will need to have the following installed:
- Node.js 18 or greater
- npm (this comes together with Node.js)
- Your favorite IDE e.g. Visual Studio Code
- Git version control system
Install Olympe
Olympe can be set up locally simply by cloning a repository available on GitHub.
- Linux & macOS
- Windows
Open a Terminal window and run the following command in a folder of your choice. It will create a folder there and install Olympe inside it.
git clone https://github.com/olympeio/olympe-project-template.git
cd olympe-project-template
npm install
npm run serve
To stop the server, press Ctrl-C. Closing the terminal window, will also stop the process. Restart it with the "npm run serve" command.
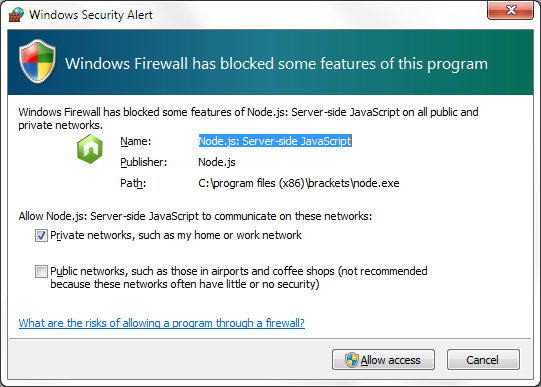
Open a PowerShell window and run the following command in a folder of your choice. It will create a folder there and install Olympe inside it.
git clone https://github.com/olympeio/olympe-project-template.git
cd olympe-project-template
npm install
npm run serve
If asked, allow access to Node.js
To stop the server
- Hit CTRL+C 2 times
- Confirm you want to end the process by pressing the Y key
- If it does not work, open a new PowerShell window and run the following command
taskkill /F /IM node.exe
Start composing with DRAW
- In your browser, open this url http://localhost:8888/
- Authenticate with your Community credentials
- See that your Community projects are present
That's all!
You can now take a look at our guides and tutorials, and start building a first app and add a first coded function.
Also, take a look at the README.md file for more details on the local commands.
Launch a Service App as a back-end service
If you have a Service App and want to run it as an actual node.js back-end process, these are the steps to follow:
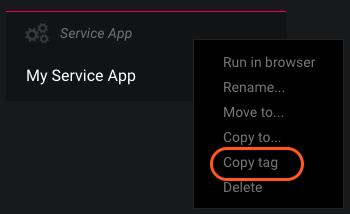
Get the tag (the Olympe unique identifier) of the Service App from the context menu of the Service App:
Then use it as the value of the parameter
sc.appin the fileres/oConfigNode.jsof your project:{
"sc.app": "<your application tag>"
}Example:
{
  "sc.app": "018722493753c408c7dd"
}
Finally, run your service application using the following command:
npm run serve:node
Updating your setup after a new Olympe release
When a new release occurs, your package.json file also needs to be updated. For instance, when release 2.2.2 was out, the following changes had to be made to update the olympe dependencies in the setup's package.json file:
@olympeio/draw: 2.2.2,
@olympeio/runtime-web: 9.2.1,
@olympeio/runtime-node: 9.2.1,
@olympeio/dev-tools:2.2.0
@olympeio/core: 2.2.3
All versions are published on npmjs.com.
Fetch these package.json dependencies info automatically
- Simply generate a new project from scratch inside a different folder using the steps above.
- Copy-paste the lines from the
package.jsonto get the latest versions of the dependencies. - Run
npm installin your project.